|
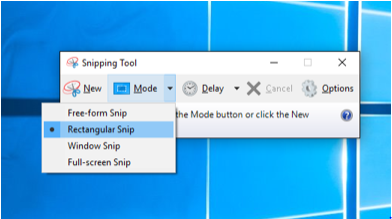
Isn’t it funny how things we use frequently we take for granted? One of the tools that I use often when researching online is the Microsoft “Snipping Tool”. Let me show you why I like it. Microsoft’s Snipping Tool comes automatically with any computer that has the Windows operating system. It’s been around for a long time. It does just what you’d expect…allows you to “clip or snip” a portion of a document and save it as jpeg or another file. How to use it. Sometimes, I find that when I try to download a document, it doesn’t always download quite as I expect. If your screen allows you to view the document in its entirety, I use the snipping tool to capture the document by using the selecting the entire document. I also find that by using the snipping tool to capture more than the document. I might expand the selected area to include the web address and source information all in one fell swoop. This might seem counter intuitive, but I find it is the best way for me to ensure that I’ve collected all the source information. I also find that when researching a topic or individual, I may open a word document and copy and paste my snips into one main document, making sure that I’ve captured clear images of the document and relative source information. Closeup Please. Sometimes you want to be able to look closer at a section of a census record or other document. By using the snipping tool, you can grab a close-up of that section to print or save as an easy way to view that portion of the record. As you work through what you’ve found with you research, you may want to create an image of the document only with the proper attributes to file within your family folders. I do this by making a copy of the snip and then “snip the snip” to get an image of the document alone, knowing that I can still reference the source information on the original. folders. Where to find the Snipping Tool Using the Start menu, search for “Snipping Tool” to find the Snipping Tool App. Before you left-click to open it, right-click and pin to your tool bar so that it is handy to grab when you find something to copy. You can see that you have choices about what you capture and can delay the timing of the capture. I tend leave the Mode setting at Rectangular Snip and haven’t bothered with the delay option. When you are ready to capture your snip, make sure that what you want to capture is on the page, choose New on the snipping tool and then drag the frame that appears to encompass the area you want to capture. Once you have done that choose “save as” under file and choose location on your computer and the file type that you’d like to use: JPEG, GIF, PNG or MHT.
I hope the Snipping Tool is a useful genealogy tool for you. For me it makes research online more productive as I can easily capture documents and key components of a document or pictures. Have fun experimenting with this handy tool!
1 Comment
chris cyr
12/6/2022 10:44:49 pm
a bit confusingj
Reply
Leave a Reply. |
AuthorWith a lifelong passion for genealogy and history, the author enjoys the opportunity to share genealogy tidbits, inspiring others to research and write their family story. Archives
July 2024
Categories |


 RSS Feed